Classic Yellow School Bus Patch
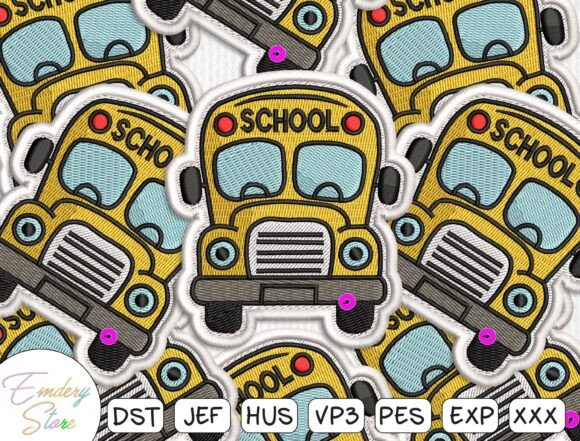
There is a distinct, almost nostalgic warmth associated with the sight of a classic yellow school bus. It signals safety, routine, and the beginning of new chapters for students across the country. For crafters, educators, and small business owners looking to capture that spirit, the Classic Yellow School Bus Patch offers a charming way to personalize gear. This embroidery design features a friendly front-view of the iconic vehicle, complete with light-blue windows, bold red stop lights, and the word "SCHOOL" emblazoned across the top. With its detailed stitching—from the textured grille to chunky black tires—and a clean white satin-stitched border, it is an excellent choice for backpacks, denim jackets, or supply pouches.
However, bringing this high-density design to life on fabric requires more than just hitting "start" on your embroidery machine. Many creators overlook the technical nuances of dense motifs like this bus, leading to puckering, thread breaks, or a loss of detail. Understanding the mechanics behind this specific patch design can mean the difference between a professional-looking finish and a project that ends up in the trash bin.
Understanding High-Density Embroidery Challenges
The description of this patch highlights several elements that contribute to its visual appeal: the bold text, the solid body of the bus, and the intricate details of the wheels and grille. In embroidery terms, these are high-density areas. High density means there is a lot of thread packed into a small space. While this creates a rich, textured look similar to a woven label, it also introduces physical stress on the fabric.
A common mistake beginners make is treating all embroidery designs as if they have the same structural requirements. A delicate floral motif might glide through on lightweight cotton, but applying that same tension settings to a Classic Yellow School Bus Patch can cause significant issues. The heavy stitch count required for the yellow body and the black tires can easily distort thin fabrics, causing them to pucker around the edges of the white satin border. If you attempt to embroider this directly onto a thin polyester blend t-shirt without proper stabilization, the result will likely be a wavy, distorted image rather than the crisp, cheerful icon intended.
The Importance of Stabilization Choices
To avoid distortion, choosing the right stabilizer is non-negotiable. For a design with a substantial footprint like the school bus, a cut-away stabilizer is often the safest bet, especially if the final product (like a denim jacket or canvas backpack) will undergo frequent washing. Tear-away stabilizers might suffice for temporary projects, but they often leave behind lint or fail to support the fabric during the aggressive stitching of the dense tire areas. Always test your stabilizer combination on a scrap piece of your actual project fabric before committing to the final item.
Thread Selection and Colorfastness
The aesthetic success of this patch relies heavily on the contrast between the classic yellow body, the light-blue windows, and the stark white border. When selecting threads, consider the durability of the colors. Yellow threads, particularly bright ones, can sometimes appear faded or translucent if the thread quality is low or if the underlay stitches do not fully cover the base fabric. Similarly, the bold red stop lights need to pop against the yellow; using a dull or washed-out red thread can muddy the overall impact of the design.
Another overlooked detail is the sheen of the thread. Polyester embroidery threads offer a slight luster that enhances the "clean" look described in the design's profile. Cotton threads, while natural, may lack the necessary strength for such dense stitching and can break more frequently under the tension required for the bus’s outline. For entrepreneurs creating custom gifts for bus drivers or back-to-school merchandise, investing in high-quality polyester threads ensures the patch remains vibrant even after multiple wash cycles.
Placement and Fabric Compatibility
Where you place the patch is just as critical as how you stitch it. The design is versatile, suitable for backpacks, jackets, or pouches, but each material presents unique challenges. Denim is thick and sturdy, making it an ideal candidate for this heavy-duty patch. However, because denim has a loose weave, you must ensure your needle is sharp enough to penetrate cleanly without pushing the fibers aside, which can lead to skipped stitches.
Conversely, soft fabrics like fleece or jersey require extra caution. The weight of the embroidery can weigh down the fabric, causing it to sag over time. In these cases, reinforcing the area with interfacing before embroidery is highly recommended. Furthermore, when placing the patch on a backpack, consider the wear and tear. A patch on the front flap of a bag will face friction from zippers and other items. Ensuring the satin border is tight and secure prevents fraying at the edges, maintaining that professional look for years to come.
Testing Before Production
If you are a small business owner planning to sell these personalized items, never skip the production run test. Create a sample batch using the exact materials you intend to sell. Check for:
- Puckering: Does the fabric remain flat after the dense stitching?
- Thread Tension: Are the top and bottom threads balanced? Loose top threads can tangle, while tight top threads can cause the bobbin thread to show on the surface.
- Detail Resolution: Can you clearly see the "SCHOOL" text and the texture of the grille? If the text looks blurry, your hoop may have shifted, or your digitizing may need refinement.
Customization and Personalization Tips
One of the strengths of this digital design file is its adaptability. While the standard version features the word "SCHOOL," many users find value in modifying the text to suit specific needs. For instance, you might change the text to "DRIVER" for a gift, or add a student's name below the bumper. However, remember that adding text increases the stitch count and density. Ensure your embroidery software allows for adequate spacing so that the new text does not crowd the bus’s headlights or grille.
Additionally, consider the color palette variations. While the classic yellow is iconic, some modern aesthetics prefer muted tones. You might experiment with mustard yellows or olive greens for a more vintage feel, provided the contrast with the white border remains strong enough to define the shape. Always preview these changes in your software to ensure the design retains its balance and readability.
Evaluating the Source and File Quality
When purchasing or downloading a Classic Yellow School Bus Patch file, pay attention to the format compatibility. Ensure the file supports your specific embroidery machine brand (e.g., PES, DST, EXP). More importantly, check the reviews or previews for stitch accuracy. A poorly digitized bus design might have overlapping stitches in the window areas, resulting in a thick, stiff patch that feels uncomfortable to wear. Look for descriptions that mention "smooth runs" or "optimized underlay," as these indicate a higher level of craftsmanship in the digitizing process.
In conclusion, the Classic Yellow School Bus Patch is more than just a cute graphic; it is a robust embroidery project that rewards careful preparation. By respecting the density of the design, selecting appropriate materials, and testing thoroughly, you can create personalized items that are both visually striking and durable. Whether you are crafting a heartfelt gift for a school staff member or launching a line of back-to-school accessories, taking the time to get the technical details right will ensure your work stands out for all the right reasons.